Showing posts with label How To. Show all posts

Sunday, June 9, 2013

Mommy-Made Gifts, a Fun Fishing Game

Back when I first started window shopping for Lucy's birthday gifts I realized a lot of the stuff I wanted to get for her was for her age specifically and would be ether frustrating if Michael tried to join in (Playmobil sets) or was stuff that was above his current capabilities (Games and Puzzles). I like the kids to give each other a gift every year for their birthday that they can do together and as I started thinking about this.... ding ding ding! A magnetic fishing game! Perfect! Now to find one I liked (haha - sometimes a hard task).

Much to my chagrin, most of the sets online were plastic - I don't mind plastic, they just looked "plastic." Does that make sense? The one set I found that I liked a lot was this one, made by Janod - but I really didn't want to spend $20... My next stop was Pinterest (maybe should have been my first stop?) and I found this adorable idea:
(I've tried to follow the link but the original post doesn't exist anymore :-/ ) 
The moment I saw this pin, I knew I was going to make Lucy a fishing game! And as I started gathering supplies - I had 90% of the needed supplies already on hand. 

Usually I'd just give you a link to the tutorial I followed and give you a few things I learned along the way - but because there isn't a tutorial, I thought I'd share a little one of my own! :) Let me know if you have any questions! 

1. Gather your supplies.
 You'll need 
  • Felt
  • Coordinating fabric scraps
  • A large blue piece of fabric (this will be your water - totally optional).
  • Pinking Sheers
  • Scissors
  • Fish Shape Template (I freehanded mine and cut it out of regular paper) and Fish Face Template (using your Fish body template as a guide, make a face template)
  • Coordinating Buttons
  • Sewing Machine
  • Coordinating thread (optional but fun)
  • Twine or ribbon
  • Magnets
  • Embroidery Thread
  • Hot Glue Gun and Glue
  • A sturdy but slender dowel
2. Using your Fish Body Template, trace and cut out the pieces of your fishies from both the felt and fabric. When cutting the felt, use straight scissors and when cutting the fabric, use pinking sheers and cut inside your guide (that way they will be a bit smaller than the felt ones). Using the Fish Face template, cut a piece out of the felt*.

*I learned the hard way - my first round of fish faces were too short and didn't end up covering the magnet's I purchased. So take magnet size into consideration when you cut out your faces. You can also double up the felt on the face to make it more sturdy - I ended up doing this with round 2 faces because my felt is pretty cheep and I didn't want the magnet to make it "pull" after it had been used for awhile. 

3. Match up your coordinating buttons with your fabric fishes - sit back and admire your work thus far.

4. Using your sewing machine, straight stitch around the fish. This secures your fabric fish to the coordinating felt fish.

5. Glue your Magnet onto the "face area" of your fish. I used E6000. This step is optional, but I didn't want the magnet "Floating" around in the face of the fish, I worried it would result in misshapen fish. Haha, maybe I was over thinking it, but I did it. :)

 Here is the packaging from the magnets I purchased. I got two packs from Hobby Lobby.

6. Sew your button eyes onto the fish faces. (These were Round 1 faces :-/ I had to do this step twice... )

7. I used Embroidery Thread and stitched my faces onto the bodies - I had hopped to do this step with my sewing machine, but my magnets were too large and my machine couldn't stitch around them. Oh well, that's what you get for purchasing economical but strong magnets (seriously you can spend a lot of money on magnets!).


8. Make "Worms" - be creative! I sandwiched my twine string in between two pieces of felt with "worms" sewn on. My "worms" are crosses between hooks and bugs... I like them, but they might not make the kids think "bait" upon first look. Haha
I zig-zagged my string to a piece of felt, before sewing the fabric on so the stitching would be "hidden." After prepping both sides, I glued a magnet between the two sides and stiched around the edging with embroidery thread. 


 Testing testing 1 2 3! It works! :) 
9. Make your Fishing Rods, I had my dowel into two equal pieces (Brad did this step for me) and then I glued the twine onto them.
 My Handy-Dandy-Crafting-Tray! Everyone needs one. No Joke. 

 I eyeballed how long I wanted the drop to be from Rod to Worm and glued my twine straight back about 3 inches onto the dowel. 

 Then I rolled the twine around, attaching it with hot glue. 

 I finished the end by putting hot glue on the tip, laying my raw end onto it and covering as much as I could with my "worm string" make sense? I hope the above picture is worth a thousand words. Haha :)

 Finished fishing rods! 

10. Optional, hem your "water" fabric. I didn't have navy thread, so I got fancy with a decorative stitch and a different color blue. 
This is old light-blocking curtain fabric from our Chicago Condo - I've used it to line Michael's current curtains and had the perfect amount left for this project! :) Yeah for using what you've got!
11. Sit back and admire your hard work!

(Optional) Try it out before the kids see! :)

I hope that was clear! Again, please ask questions if I need to clarify or completely left something out!

I had everything except the Magnets and Twine (I had JUST run out!) - so I was able to make this fun game for $7 

I can't wait for Lucy to get her "fishing game" from Michael on Friday - 5 more days.... :) 

Tuesday, March 29, 2011

How To: Making Decorative Balls

These days, filling vases, apothacary jars, bowl and baskets with decorative balls has become "very fashonable." :) But these decorative balls can be so expensive! Bloggers and crafters have long known that you can, in fact, make decorative balls all by yourself. Yes, I am here to tell you that you are capable of participating in this craft. :) There are lots of tutorials out there, but I thought I would show you how I made two different types of decorative balls, Jute and Spanish-Moss. 

But first things first,
 
 It is imperitive that you have good music to craft to. Imperitive. (that means very important, essential) I'm a huge fan of Pandora and lately I've been loving the Laura Story station - great worship.

Ok, now onto burning our fingers creating our decorative balls.

Supplies Needed
  1. Spanish Moss (the off brand was called American Moss.... hahahaha!)
  2. Natural Jute/Twine
  3. Styrofom Balls (the white craft type, not the army-green floral ones) - you could use anything round that you have at home, I've seen some people use old balls that their kids are done with - my baby being young, I thought it best I not use her toys for my craft. :) 
  4. Your trusty friend, the glue gun. He will need to be heated up all the way before beginning this project.
  5. More ammunition for your gun, you will need aprox 4 sticks to make two balls (one of each type).
  6. Scissors
How to Make a Jute Decorative Ball

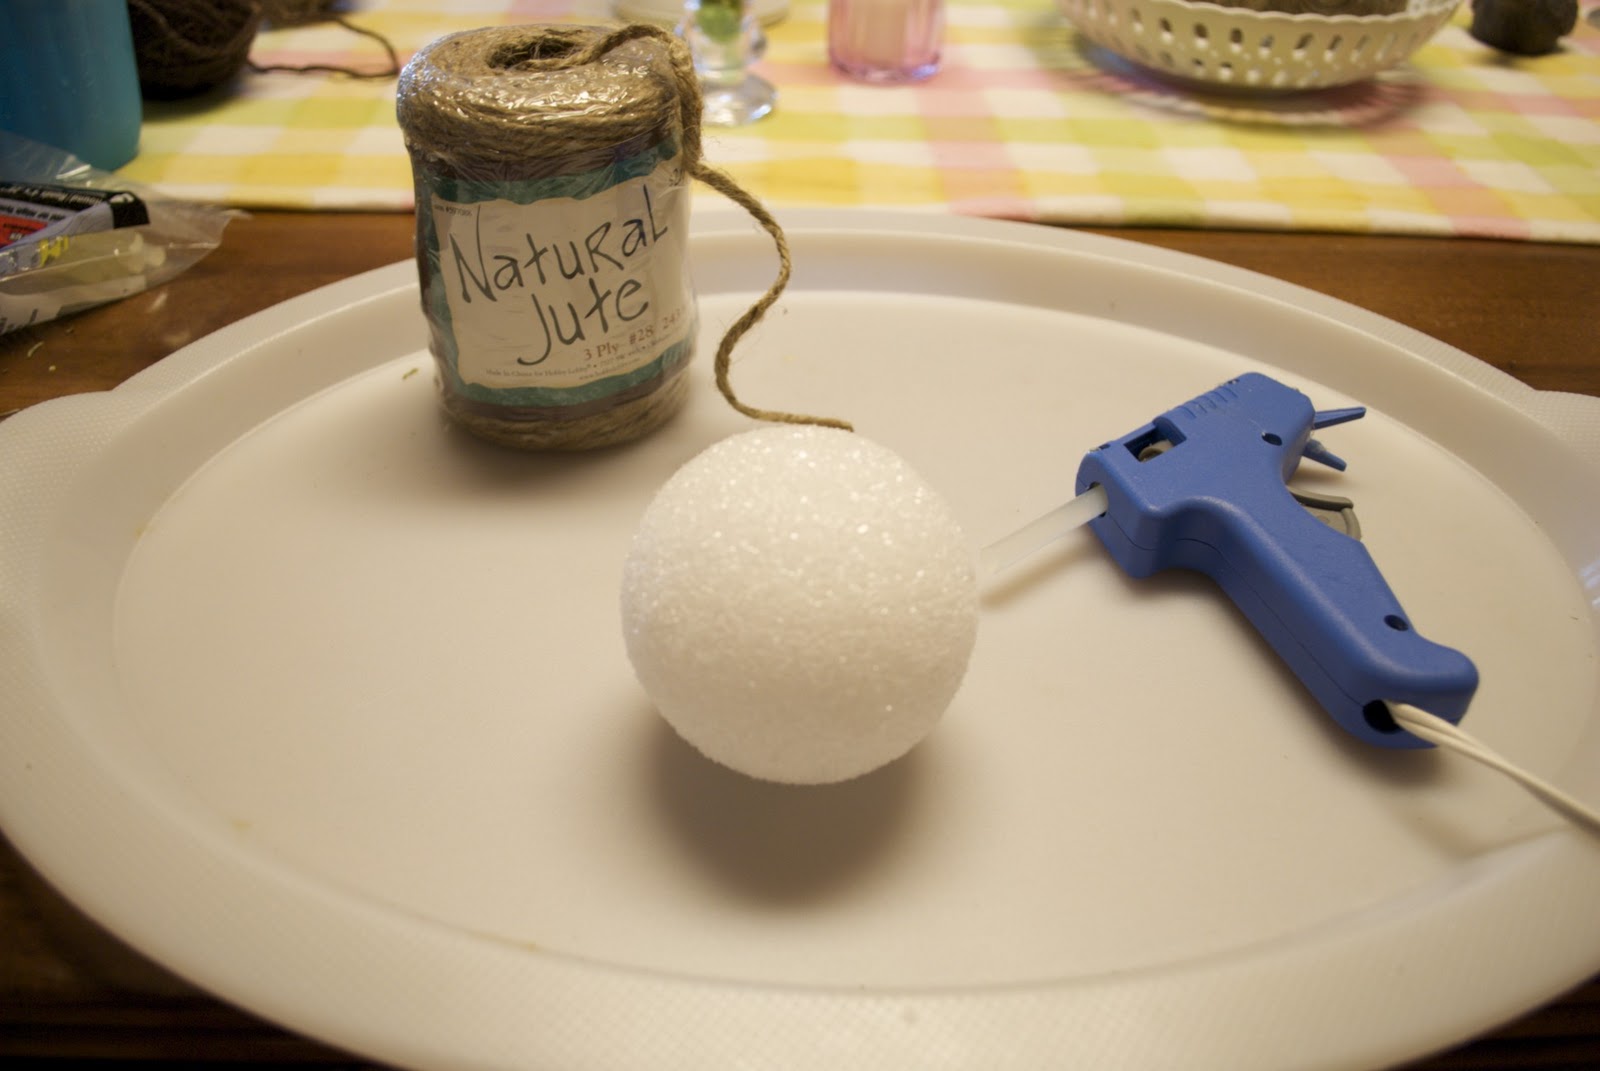
 I like starting with a nice clean work station, it makes me realize how much of a mess I make when crafting - I don't mind cleaning up craft messes. :) I like to use a tray underneth projects like this, it helps contain the mess a bit - and protects my dining room table from glue.

  1. Put a dot of glue on to your Styrofoam ball, and put the tip of your jute onto it. Let dry - only takes about 10-15 seconds and gives you a firm foundation that is not going to move.
  2. Put down no more than 1/4 inch glue at a time to establish your circle shape. Begin to go around the initial place where you attached the jute.
  3. You can begin to put a bit more glue down now, but no more than the length of half of your circle. (If your jute falls off, it is difficult to put it back the same way it was before, leaving you bits of white hot-glue in your string. A bit of this is to be expected, but too much isn't attractive.)
  4. Continue gluing and wrapping your jute around, working from the top-down. 
  5. Repeat step 4.
  6. When you are half-way done wrapping your ball, turn it over and begin working from the bottom-up.
  7. Repeat step 4.
  8. At this point, you will need to start working in 1/2in to 1in segments again, since you are not wrapping your jute around an established layer anymore, but are instead "laying" on the previous layer. 
  9. Continue wrapping/laying the jute until you are two "turns from being done" lay the jute into the rest of the circle without gluing so that you can see where you need to cut the jute and finish your string.
 While you are working on your decorative ball, no one will blame you if you turn it to the side and pretend it has a face. :) 

 It may be helpful to allow the ball to "unwind" to allow the string you are wrapping to relax and not be bunched up because of tension (you know when it curls?). 

 Ok, so picking up in step 9 - hold the jute so you can see where you need to cut. 

 (I think it looks like a coconut bomb from Swiss Family Robinson!) Put a dab of hot glue on the end of your jute, to keep it from unraveling - wait a few seconds before shaping it to the string. Then fill your "hole" and lay down your jute to finish the ball. 


 There you go! A jute ball! Good job! See that wasn't too bad right?!


How to Make a Spanish Moss Covered Ball
  1. Approach this stuff with caution, it is messy.
  2. Take some moss out of the bag, I found it necessary to cut out what I thought I would need - it was so tangled. 
  3. Spread out your moss, so it is in a few clumps but still attached (if it comes unattached, it's ok) try to keep the moss "clumpy" the more you have the better coverage you will have.
  4. Take a Styrofoam ball and put a zig-zag (yes, it's a technical term) of hot-glue on it.
  5. Take some of your moss and hold it against the fresh hot-glue. (go to step 7)
  6. Continue to make zig-zags and hold your moss against it, shaping the moss around the ball. This is a two hand process, but I had to take the picture with one of my hands. Go to step 8
  7. (Ahem... so sorry this is out of order, I didn't notice until just now.....) The moss should stick pretty well, the more you "scrunch" the moss together, the less you will be able to see your ball (some people reccommend painting your ball a dark color, so that if you can see it through the moss it isn't white, but I didn't have spray paint and didn't want to make more mess - if you have trouble getting good coverage on your decorative ball, it may be helpful for you to paint them before you begin to cover.) Go back to step 6.
  8. Well, that was kinda a choose- your-own-adventure, in the fact that you were jumping from point to point. Anywho.... Make sure you get good coverage with the moss, there is no shame in going back into the (albeit scary) bag to get more moss. 
  9. You are done! :) Way to go!
(Side note: I have tried to use tacky glue to make this and it doesn't work as well as the hot-glue. It doesn't "grip" the moss like the hot-glue does. :) )

 Remove any yuck like this from your moss, it doesn't make for pretty decorative balls. 

 And there you have it! A fun, springy (both the season and the motion) decorative moss ball. You can glue down all the ends, but I think they looked natural and kinda sassy poking out everywhere. :)

FYI: The jute balls take about 15 minutes to make, I am convinced that all the upping and downing with the hot-glue gun eats time. The moss ball took 4 minutes. Yes, that fast. :) It is a little more of an organic process and not so precise like the jute (if that makes any sense).

 Whatd-I-tell-ya about the mess.... use a tray... you will thank me. :)

I thought it was crazy - but all three of these are the same size (at least they were when I started)! I think the hot-glue shrinks the Styrofoam a bit.

 This is how I am displaying my decorative balls right now, but once I make enough I am going to fill my apothecary jar with them. 

Another idea for covering/wrapping - wouldn't it be fun to wrap a bunch of balls and put them in a basket for fall/winter. Something about yarn just calls out for cool, crisp weather and hot chocolate. :) Do you have any other covering/wrapping ideas? I've seen them made with coffee beans (ohh, might be a neat combo with the yarn!) and sea shells.

 Which one is your favorite? I find myself stuck, I seriously can't decide. I love the texture the jute one gives a bowl/vase/jar/basket but the moss one is so fun and a bit crazy - yes, I like things a bit crazy sometimes. :)

Tuesday, June 29, 2010

How To: Hair bow for infant

We interrupt the regularly scheduled programing to bring you a How To Special. :) How to make a hair bow for an infant. Enjoy! (A good friend, Abby Naus, told me how to make these bows - all credit goes to her for creativity! :) )

Infant hair is so fine that many store-bought barrettes do not stay in. But if you have the following supplies in your house, you can make some barrettes in 4 easy-shmezy steps. :)
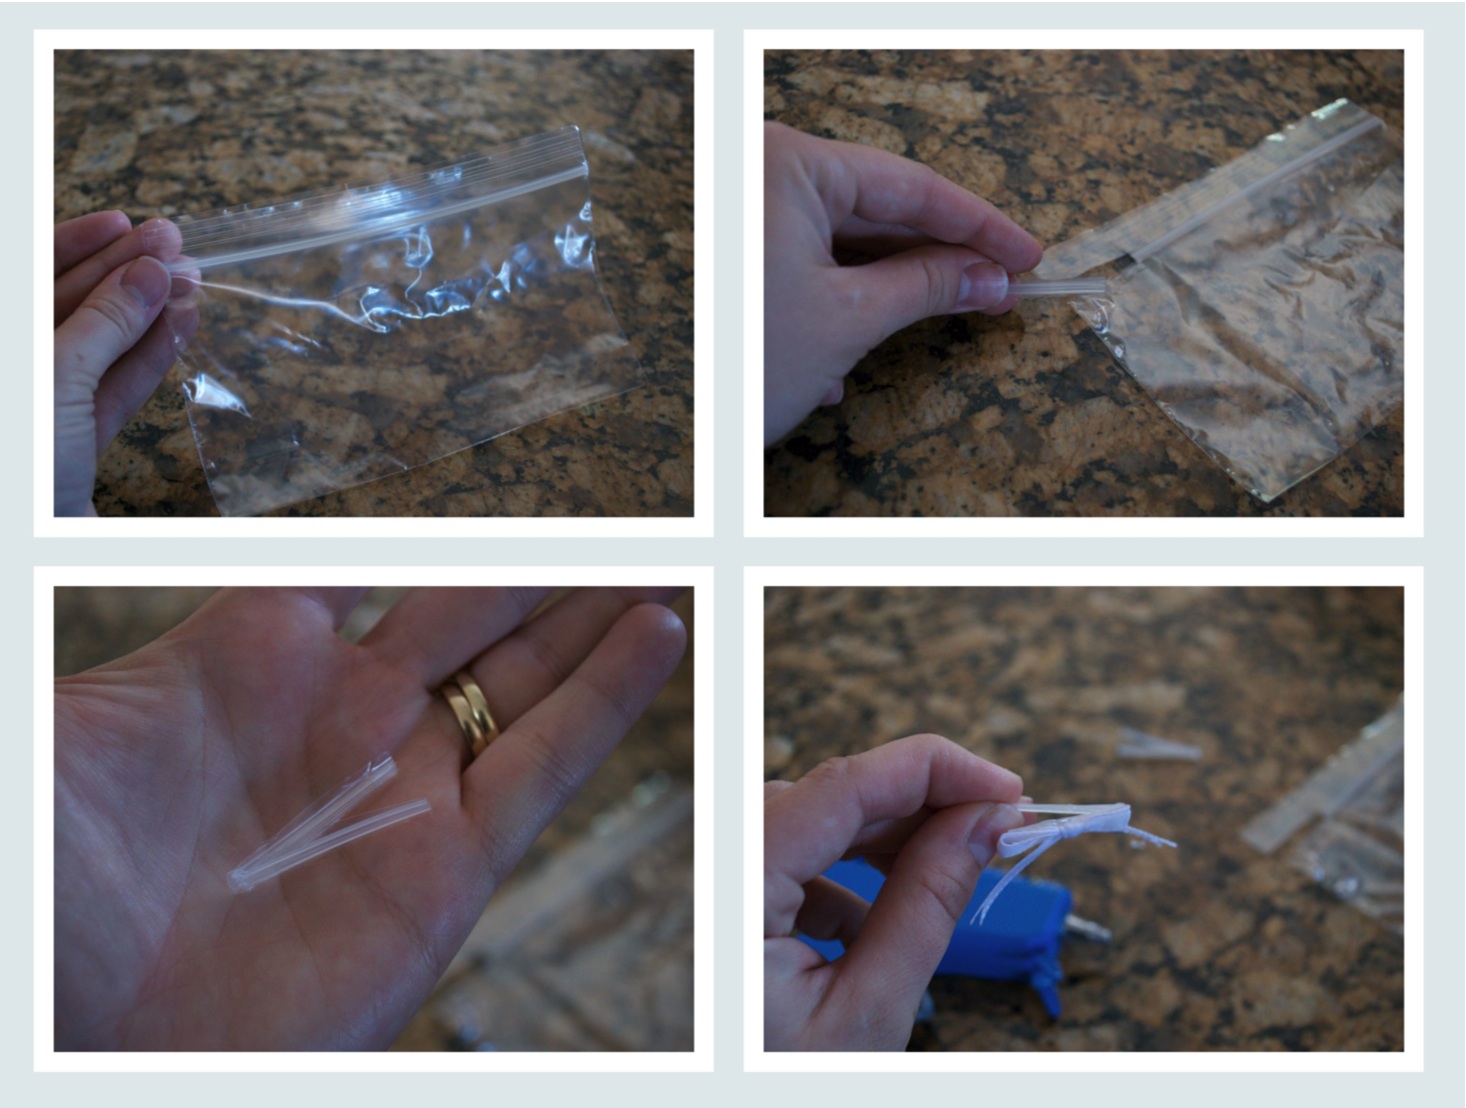
  1. Zip-Lock Baggie
  2. Scissors
  3. Narrow Ribbon
  4. Hot Glue Gun

(You can click on the above image to enlarge it)

First, cut the zipper out of your zip-lock bag.
Second, tie your ribbon into a little bow.
Third, glue your ribbon to the zipper from your bag.
Forth, put your new barrette into your baby's hair.
Done! :)


Beautiful!